This article was written 301 days ago. The content of the article may be out of date.
This note covers the compute, networking, and storage services sections of the AZ-900 exam. It includes key Azure services such as virtual machines, virtual networks, and storage accounts, along with modern tools like Azure Functions and Azure OpenAI. These sections account for about 35–40% of the exam and provide a solid understanding of Azure’s core service offerings.
Compute Services
Virtual Machine
A Virtual Machine (VM) is a software-based emulation of a physical computer. It has:
Its own virtual CPU, memory, disk, and network interface.
An operating system installed (Windows, Linux, etc.).
The ability to run applications independently.
Difference from a Physical Computer
In a physical system, all apps share one OS—if one crashes, the whole system might go down.
In a virtualized system, each VM is isolated. A crash or misconfiguration in one VM doesn’t affect others or the host machine.
Why It Matters
Isolation: Every VM runs in its own sandbox.
Multi-tenancy: Many users or companies can safely use the same physical hardware.
Flexibility: You can choose your OS, install software, configure settings freely.
How Azure Manages VMs
Azure provides the infrastructure: virtual hardware, storage, networking.
You manage the OS and applications.
This makes Azure VMs part of Infrastructure as a Service (IaaS).
Creating a VM in Azure: Key Steps
When creating a VM, you choose:
Subscription: Which Azure plan to charge.
Resource Group: A logical container for your VM and related resources.
Region: Where in the world to host your VM.
Size: CPU, RAM specs (e.g., 2 vCPU, 8 GB RAM).
OS: Windows Server, Linux, etc.
Authentication: Set a username and password or integrate with Azure AD.
Inbound Ports: For example, open port 3389 for RDP remote access.
VM Access and Use
Connecting to a Windows VM using RDP
RDP (Remote Desktop Protocol) allows you to interact with your Windows VM just like a local computer with a graphical interface
Open the Azure Portal and go to your Virtual Machine’s Overview page.
Click the “Connect” button at the top menu.
Select “RDP” from the available connection options.
In the “Connect with RDP” panel:
You will see the public IP address of your VM.
Option to download the .rdp file will appear — click “Download RDP File”.
Once downloaded, double-click the .rdp file.
You will be prompted to enter the username and password that you configured while creating the VM.
You might see a warning about certificates — it’s safe to proceed if you’re connecting to your own VM.
After successful login, you’ll see the Windows desktop environment of your VM.
In production environments, it’s a best practice to disable RDP or restrict it to specific IP addresses to reduce attack surface.
Connecting to a Linux VM using SSH
SSH (Secure Shell) is a secure command-line connection method for Linux virtual machines.
Requirements:
A public SSH key must have been added during VM creation.
Or, a username/password combination for password-based login.
Steps:
Go to your VM Overview page in the Azure Portal.
Click “Connect” → Select “SSH”.
You’ll see an SSH command similar to this:
1
ssh azureuser@<PublicIP>
Open a terminal on your local machine (Linux, macOS, or Windows with WSL/Git Bash).
Replace /path/to/your/private-key.pem with the actual path to your SSH private key.
Replace azureuser with your actual username.
If prompted, type yes to continue the connection the first time.
You’ll now be inside your Linux VM’s command line interface.
VM Use Cases
Development/test environments
Running legacy apps
Hosting small websites
Extending on-prem systems to the cloud (hybrid cloud)
Virtual Machine Availability Sets
Availability Sets in Azure are used to improve the high availability of applications by preventing a single point of failure. This is especially important for enterprise applications that require more than one virtual machine (VM) instance to support user requests.
The Problem Without Availability Sets:
If all VMs in an application are placed on a single server rack, they share the same power and networking switches. If any of these switches fail, all VMs on that rack could go down, affecting the availability of your application. Availability Sets help prevent this scenario by spreading VMs across multiple server racks, each with its own power and networking switches.
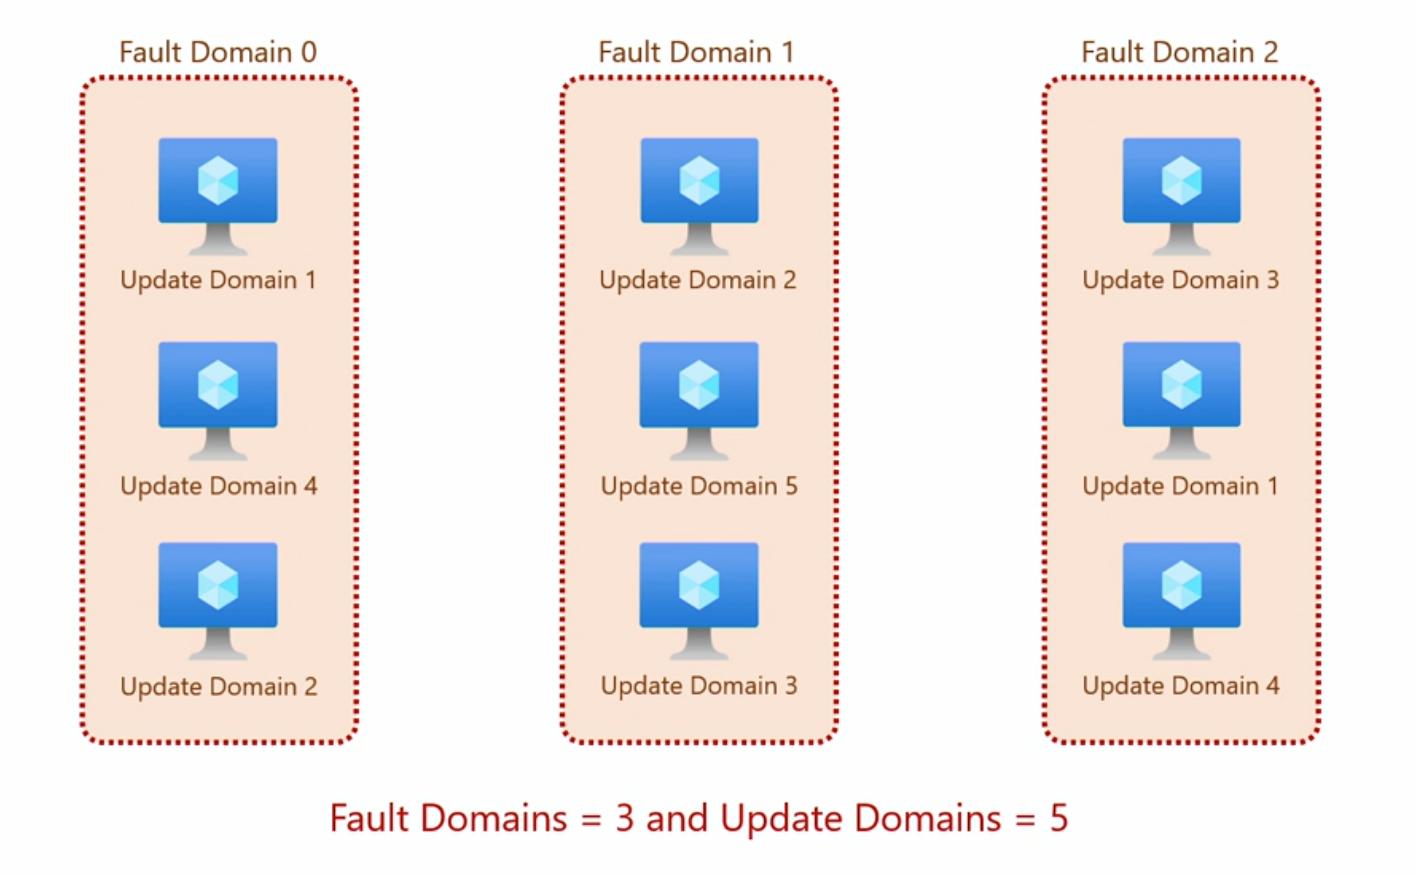
Fault Domains and Update Domains
Fault Domains (FD):
Fault Domains represent groups of VMs that share a common power and networking switch.
In the event of a failure of a switch (power or networking), only the VMs within the same fault domain are impacted.
VMs in an availability set are spread across different fault domains to ensure that not all VMs are affected by a failure at the same time.
Update Domains (UD):
Update Domains are used during maintenance and updates. When Azure needs to perform maintenance (e.g., update the underlying hardware or reboot VMs), it does so in stages to avoid bringing down all VMs at once.
VMs within the same update domain will undergo maintenance together (e.g., rebooting).
The more update domains you have, the fewer VMs will be affected at once during maintenance.
How Fault Domains and Update Domains Work Together
Let’s look at an example with 9 VMs, where we use 3 fault domains and 5 update domains.
Only one Update domain go down for maintenance. In this case, at most 2 VM go down for maintenance, and we will always have at least one available.
Benefits of Availability Sets
Higher Availability:
VMs are spread across multiple fault domains and update domains, ensuring that if a failure happens in one domain, the others remain unaffected.
Even if one rack fails or one update cycle causes downtime, the rest of your VMs remain available to serve the application.
Reduced Maintenance Impact:
By spreading out VMs into update domains, Azure ensures that only a small subset of VMs is impacted by maintenance, ensuring better uptime.
Cost-Free Feature:
The availability set itself does not have a direct cost. You only pay for the VMs, not for the arrangement of the VMs in fault or update domains.
Predictable Workloads:
This setup is ideal for predictable workloads with steady demand. For applications that need high availability and cannot afford downtime, availability sets are critical.
Virtual Machine Scale Set (VMSS)
A VM scale set is an Azure compute resource that lets you:
Automatically deploy and manage a group of identical or similar VMs.
Automatically scale the number of VMs up (scale out) or down (scale in) based on demand (CPU, memory, network, etc.).
Achieve high availability and high scalability.
How is it different from an Availability Set?
Availability Set: Ensures your VMs are distributed across fault domains and update domains to protect against hardware failures and maintenance events.
Scale Set: Includes those benefits (built on availability sets), but adds scaling capabilities for handling fluctuating workloads.
Key Concepts in VMSS:
Configuration Model containsx :
OS image
VM size (e.g., Standard B2s)
Network settings
Installed applications
Azure uses this as a template to deploy new VMs.
Orchestration Modes
Mode
Description (When to choose)
Uniform
All VMs are identical. Good for simple scenarios (e.g., web servers).
Flexible
VMs can be different (e.g., mix of Windows/Linux or different configurations).
Initial VM Count
You start with a set number (e.g., 5 VMs).
Scaling Options
Manual Scaling: You decide when to add/remove instances.
Auto Scaling: Based on metrics like:
CPU usage
Memory usage
Network traffic
Disk IO
Scale-In Policy
When load decreases, VMs are removed. You decide whether:
Newest VMs are deleted first
Oldest VMs are deleted first
Cost
You only pay for the number of VM instances running. The orchestration/configuration setup itself has no cost.
Example Use Case
You define a scaling rule
You set a condition in the VMSS settings, for example:
“If average CPU usage exceeds 70% for 10 minutes, add 2 more VMs.”
You also set:
Minimum and maximum number of VMs (e.g., min: 2, max: 10)
Cool-down period (e.g., 5 minutes between scaling actions)
Azure Monitor watches your VMs
Azure continuously monitors performance metrics:
CPU usage
Memory usage
Network in/out
Custom metrics (if you define them)
Threshold is triggered
If your app gets busy (e.g., more users = more CPU), and the defined threshold is breached (e.g., CPU > 70% for 10 mins), Azure triggers scale-out.
Azure uses your configuration model
Azure launches new VM instances using the template you originally defined:
Same OS image
Same app setup
Same network settings
Same load balancer integration
These VMs are:
Placed across fault and update domains (for high availability)
Added to the backend pool of your Azure Load Balancer (so they start handling traffic)
New VMs boot up and join the group
Within minutes, the new VMs are:
Running
Serving traffic
Monitored just like the existing ones
Example:
Let’s say you have a web app under heavy load.
If the CPU spikes:
Azure waits 10 minutes (as defined).
It sees 80% CPU usage consistently.
Triggers scale-out: launches 2 more identical VMs.
Load balancer starts routing traffic to the new VMs.
Result: Your app remains responsive without downtime.
Azure Virtual Desktop (AVD)
Azure Virtual Desktop (AVD) is a cloud-based service that provides employees with access to virtual desktops and applications hosted in Azure. Instead of relying on local machines, users connect to virtual machines (VMs) in the cloud, ensuring centralized management and enhanced security.
Key Benefits
Centralized Storage and Management: Apps and data are stored on VMs in Azure, not on local devices.
Device Flexibility: Users can connect from Windows, macOS, iOS, or Android devices.
Enhanced Security: Data remains in Azure even if a device is lost or stolen.
Cost Efficiency: Reduces the need for high-spec personal devices and Windows licenses.
Deployment Options
Single-Session: One user per VM (dedicated desktops).
Multi-Session: Multiple users share one VM (cost-saving shared desktops), with isolated user profiles.
Components
Host Pools
A host pool is a collection of virtual machines in Azure used to deliver desktops or apps to users.
Each host pool is associated with:
A session type (single-session or multi-session)
A VM configuration (size, OS image, etc.)
User assignment settings
Session Types
Single-session: One user per VM (like a personal desktop).
Multi-session: Multiple users share one VM, with isolated profiles (more cost-efficient).
User Profiles
Each user’s data is separated into a user profile.
Even in multi-session setups, users cannot access others’ data.
Remote Apps
Instead of providing a full desktop, AVD can stream individual applications (e.g., Excel, Outlook) to the user’s device.
Think of it as app streaming similar to streaming movies, but for software.
Integration and Access
Supports Azure AD, MFA, conditional access, and OneDrive integration.
Enables streaming of apps and desktops without requiring high local hardware specs.
Costs
There is no charge for using the AVD infrastructure (host pools, configurations).
You only pay for:
Virtual Machines (compute costs)
Storage (user profiles, OS disks, etc.)
Software licenses (Windows or Microsoft 365 apps, depending on your agreement)
Scalability & Flexibility
Organizations can scale up/down VM instances based on:
Workload requirements
Time of day
Number of active users
AVD supports automation and auto-scaling to reduce costs and optimize performance.
Azure App Service
Azure App Service is a Platform as a Service (PaaS) offering that enables users to host web apps, mobile backends, and REST APIs without managing underlying infrastructure.
How It Differs from Virtual Machines (IaaS)
In Infrastructure as a Service (IaaS) (like with Azure Virtual Machines), the cloud provider manages the hardware, but the customer manages the OS, frameworks, and application.
In App Service (PaaS), Azure manages hardware, OS, and runtime/frameworks. The customer only manages the application code.
This shifts operational burden from the user to Microsoft, increasing efficiency and ease of deployment.
Key Features
Supports multiple languages: ASP.NET, Java, Ruby, Node.js, PHP, Python, and more.
Flexible development tools: Compatible with Visual Studio and other standard tools.
Cross-platform hosting: Azure recommends Windows or Linux runtime based on your app’s language.
Integrated authentication: Easily link to Azure AD, Microsoft accounts, or social logins (e.g., Google, Facebook) without writing custom auth modules.
Automatic scalability: Cloud-native features like scaling, high availability, and geo-distribution are built-in, unlike traditional web hosting.
Use Cases
Hosting full web applications (frontend and backend)
Serving mobile app backends
Providing RESTful APIs for services and apps
Deployment Process Example
Go to Azure Portal and choose App Services.
Click Create App Service.
Choose:
Subscription & Resource Group
App Name (e.g., az900-as1)
Publish Type: Code (default)
Runtime Stack: e.g., .NET 7
OS: Auto-selected (Windows or Linux)
Region: E.g., South US
Pricing Plan: Default for test environments
Click Review + Create and deploy.
Access your app via the provided URL. If no code is uploaded yet, you’ll see a default placeholder page.
Benefits over Traditional Web Hosting
App Service is cloud-native, offering:
Elastic scaling
Managed security
Seamless integration with other Azure services
Simplified deployment
Traditional hosting lacks these features and often requires manual configuration and maintenance.
Azure Container Instances
Azure Container Instances (ACI) is a Platform as a Service (PaaS) offering that enables lightweight, fast, and isolated container-based application deployment without managing virtual machines or container orchestration infrastructure.
Understanding the Evolution
Virtual Machines (VMs) are part of Infrastructure as a Service (IaaS) and include a full OS for each app, making them heavy (~20GB per instance).
App Service is a PaaS solution for web apps and APIs but is still best suited for more traditional apps.
Container Instances strip away the full OS and package apps with only their dependencies (runtime, libraries) into containers, making them lightweight and faster to start.
How Containers Work
A single OS instance is shared using a containerization engine (like Docker).
Multiple containers run on this engine, each pretending to have its own OS (thanks to OS-level virtualization).
These containers form a container group if they run on the same engine, sharing resources and lifecycle.
Key Features of ACI
Azure provisions the OS and container engine, while the user controls the containers.
This makes ACI a PaaS solution.
Supports both Linux and Windows containers, depending on your application needs.
Does not include its own virtual hard disk – for persistent storage, you must integrate with Azure Storage.
Use Case: Microservices
Containers are ideal for microservices architecture, where applications are broken into small, manageable, and independently deployable services.
This contrasts with monolithic architectures, where everything is bundled into one large application.
Caution
While containers and orchestration (like Kubernetes) are trending, use them only if your scenario truly requires it.
ACI is a good entry point if you need quick, standalone containers without orchestration overhead.
Comparison to Other Azure Services
Feature
VM (IaaS)
App Service (PaaS)
Container Instances (PaaS)
OS Managed By
Customer
Microsoft
Microsoft
App Code Managed By
Customer
Customer
Customer
Startup Time
Slow
Fast
Very Fast
Use Case
Full control needed
Web & API hosting
Microservices, fast deployments
Resource Usage
Heavy
Medium
Lightweight
Azure Functions
Azure Functions is a Platform as a Service (PaaS) offering that provides serverless compute—a model where small blocks of code are executed on-demand, and you only pay for the actual computation time, not idle time.
What Sets Azure Functions Apart
Feature
Virtual Machines (VMs)
Container Instances
Azure Functions
Always-on resources
Yes
Yes
❌ No
Pay for idle time
✅ Yes
✅ Yes
❌ No (only during execution)
Provisioned in advance
✅ Yes
✅ Yes
❌ No (on-demand)
Control over infrastructure
High
Medium
Low (fully managed)
Ideal for
Long-running workloads
Microservices
Event-driven or burst workloads
How Azure Functions Work
Code is broken into small blocks (functions).
Each function is triggered on-demand (via a trigger, e.g. timer, event, HTTP call).
At trigger time:
Dependencies, compute resources, and CPU are assigned dynamically.
Once execution ends, resources are released immediately.
You only pay for the actual execution time, making it very cost-efficient.
Why It’s Called Serverless
There is a server running in the background.
But you don’t manage it—no need to start/stop VMs or containers.
This abstracts the infrastructure, allowing you to focus purely on your code.
Development Support
Supports multiple programming languages: C#, Java, JavaScript, PowerShell, Python, and more.
You can choose either a Windows or Linux runtime stack for your functions.
Function Triggers
Azure Functions run based on triggers, such as:
Timer-based (e.g., every 5 minutes)
Event-based (e.g., file uploaded to Blob storage)
HTTP-based (e.g., API endpoint call)
Queue-based, etc.
Use Case: Nano Services Architecture
Functions fit well into a nano services approach—very small, focused, isolated tasks.
They are excellent for event-driven processing, real-time data pipelines, APIs, automation, and more.
How Azure Functions Work – Step-by-Step
You write the function
A function is just a piece of code that performs one task.
Example (in Python):
1
2
3
defmain(req: func.HttpRequest) -> func.HttpResponse: name = req.params.get('name') return func.HttpResponse(f"Hello {name}!")
You define the trigger
Every function needs a trigger to run.
Triggers could be:
HTTP request (like a mini web API)
Timer (like a cron job)
Blob storage event
Message queue
Event Grid / Service Bus
You define this in a function.json or via a code annotation (depends on the language).
You deploy it (or run locally)
You can run the function locally using the Azure Functions Core Tools.
Or you can deploy it to Azure via:
Azure CLI
GitHub Actions
Azure Portal (manual)
VS Code or Visual Studio
Azure handles the rest (Serverless part)
When your function is triggered:
Azure spins up just enough compute at runtime to run your function.
Installs any required dependencies (if needed).
Runs the function.
Cleans up right after execution.
You are billed only for:
Execution time (in milliseconds)
Memory used
Typical Azure Function Project Structure (Python example)
1
2
3
4
5
6
7
8
MyFunctionApp/
│
├── MyHttpTrigger/               # One function
│   ├── __init__.py              # The actual function code
│   └── function.json            # Trigger + bindings config
│
├── requirements.txt             # Dependencies
└── host.json                    # Global settings
Example Workflow: HTTP-triggered function
User sends HTTP GET to https://<your-function>.azurewebsites.net/api/hello?name=yao
Azure sees this matches a trigger
Azure:
Allocates compute
Runs your main() code
Sends back “Hello yao”
Resources are freed
Azure OpenAI
Azure OpenAI is a cloud-based platform that provides secure, private, and scalable access to OpenAI’s powerful models like:
GPT-3.5 / GPT-4 → Natural language understanding & generation
Codex → Code generation & AI-assisted development
DALL·E → Image generation from text prompts
Whisper → Speech-to-text / translation
Why Use Azure OpenAI Instead of ChatGPT?
ChatGPT (browser)
Azure OpenAI (via Azure)
Public interface
Enterprise-grade private interface
User inputs may be used for training
Data is not used for training
No fine control over identity/access
Integrated with Microsoft Entra ID (Azure AD)
Limited integration options
Seamless integration with apps, REST APIs, SDKs
Less control over resource management
Use the Azure Portal, monitor, log, scale as needed
How It Works Technically
You create a resource in Azure
Set up an Azure OpenAI resource from the Azure Portal.
Choose models to deploy (e.g. GPT-4).
You interact via API / SDK
Send prompts using:
REST API
Python SDK (openai with Azure credentials)
Azure OpenAI Studio (GUI for testing)
You manage access securely
Use Azure Identity (Microsoft Entra ID) to control who can use it.
Protect sensitive data and comply with company security policies.
How You Use It in an App
Example workflow:
1
2
3
4
5
6
7
Your App (Python backend)
   ↓
Azure OpenAI REST API
   ↓
GPT-4 generates a response (e.g., summarize a document)
   ↓
Your App renders response to user
Common Use Cases
Internal enterprise chatbot
Customer service automation
Code generation or review tools (via Codex)
Document summarization or Q&A systems
Speech-to-text or transcription tools (via Whisper)
Networking Services
Azure Virtual Network (VNet)
An Azure VNet is like a virtual version of a traditional on-prem network. It lets your Azure resources communicate securely with each other, with the internet, or with your on-premises environment.
Underlying Infrastructure
Though you don’t see it, Azure runs physical routers, switches, and hubs in its data centers. These are virtualized and abstracted to you through:
Software-defined networking (SDN): Azure uses SDN to isolate, route, and manage network traffic in the cloud.
Hypervisor-level isolation: Each tenant (user/customer) has logically isolated networking — your VNet is yours alone, even though you’re sharing the physical hardware.
VNet Components
When you create a VNet, you’re defining a few things:
Component
Description
Address Space
A private IP address range using CIDR notation, like 10.1.0.0/16.
Subnets
Logical divisions inside a VNet. Resources live inside subnets.
Network Interface (NIC)
Every VM has a NIC that’s assigned a private IP from a subnet.
NSGs (Network Security Groups)
Act as firewalls for subnets or NICs; define inbound/outbound rules.
Route Tables
Optional custom route controls; by default, Azure auto-routes within a VNet.
Service Endpoints / Private Endpoints
Allow access to PaaS services over the VNet — securely, without going over public internet.
Key Features & Concepts
Concept
Explanation
VNet = Logical Network Boundary
Each VNet is isolated from others by default (multi-tenant design).
Private IP Ranges
You define an IP address space (e.g., 10.0.0.0/16) when creating a VNet. Each resource gets an IP within this range.
DHCP Built-in
Azure auto-assigns IPs — no need for your own DHCP server.
Automatic Routing
No need to manually configure routes within the same VNet.
Default Traffic Behavior
Outbound to the internet is open by default; inbound needs explicit setup (like a public IP or load balancer).
Region-bound
A VNet spans availability zones within a single region — all resources in that region can communicate through it.
No cost
VNets themselves are free — you’re only charged for add-ons like VPN Gateways or NAT gateways.
Communication Scenarios
Scenario
How VNet Handles It
Within same VNet
All resources in the same VNet can talk to each other without special setup.
Between VNets (VNet Peering)
You can peer two VNets (same or different regions); traffic flows privately with low latency.
Internet-bound (Outbound)
All resources can go out to the internet by default (e.g., pull OS updates).
Internet-bound (Inbound)
Blocked by default. You need a Public IP, Load Balancer, or Application Gateway.
On-premises to Azure
Use VPN Gateway (IPsec tunnel) or ExpressRoute (private fiber link).
Important to Remember
Inbound internet access is blocked by default.
Each resource in a VNet must have a unique private IP.
Use Network Security Groups (NSGs) to control inbound/outbound rules.
Avoid overlapping IP address ranges when doing VNet Peering or Hybrid Cloud setups.
IP Address Assignment
Azure acts as your built-in DHCP server.
When you deploy a VM, Azure:
Chooses a private IP from the subnet range.
Assigns it to the NIC.
Optionally assigns a public IP if you enable that.
You can also:
Use static private IPs for things like databases.
Reserve public IPs if you want to maintain a consistent address.
Automatic Routing
Inside a VNet:
All subnets are automatically routed — no routing tables needed.
Azure maintains a default system route table with:
Local VNet routing
Internet route (0.0.0.0/0)
System routes for service endpoints and BGP (for hybrid setups)
If you want custom behavior (like forcing traffic through a firewall), you can attach a user-defined route (UDR).
Security & Isolation
VNet itself is isolated — no traffic to other VNets or external networks unless you configure it.
NSGs help restrict traffic at subnet or NIC level.
You can also use:
Azure Firewall
Azure DDoS Protection
Web Application Firewall (WAF) with App Gateway
Virtual Subnet
A virtual subnet is a logical subdivision of a Virtual Network (VNet) in Azure. It’s just like a subnet in traditional networking, but virtualized and managed in the cloud.
You define:
A name for the subnet
A CIDR address range (e.g., 10.0.1.0/24)
Optional settings: NSG (firewall), route table, NAT gateway, etc.
How Subnets Work (in Practice)
Imagine your VNet is like a building, and subnets are the individual floors. You put VMs or other resources on different floors based on purpose. That gives you:
Traffic isolation
Different tiers of an app (web, app, DB) can live in separate subnets.
You can control traffic between them using NSGs.
Security control
Subnet A can talk to Subnet B but not Subnet C — enforced via NSG rules.
Performance tuning
Spread workloads across subnets to load balance or apply different routing policies.
Custom routing
Attach a route table to a subnet to force traffic through specific appliances (like firewalls or proxies).
Service-specific deployments
For example, Microsoft suggests placing Azure Bastion, Application Gateway, or Database services in their own subnets.
Subnet Addressing (CIDR Example)
Let’s say your VNet has a 10.0.0.0/16 address space — that’s about 65,536 IPs.
You might divide it like this:
Subnet Name
CIDR Range
Purpose
web-subnet
10.0.1.0/24
Web front-end
app-subnet
10.0.2.0/24
Business logic
db-subnet
10.0.3.0/24
Database
Each subnet is limited to 256 IPs (actually fewer because Azure reserves 5 in each).
One Resource = One Subnet
A VM or resource can be attached to only one subnet at a time.
But multiple VMs can live in the same subnet.
You cannot move a VM to a different subnet after deployment — you must delete and redeploy or detach/reattach the NIC.
Optional Features per Subnet
You can configure each subnet with:
Feature
Use
NSG
Control what traffic is allowed in/out
Route Table
Override default routing (e.g., force through firewall)
NAT Gateway
Allow outbound internet access with static IP
Service Endpoints
Securely access Azure services (like Storage)
Delegations
Allow PaaS services (like Azure App Service) to use the subnet
Cost Consideration
Subnets are free.
Azure doesn’t charge for defining subnets — you’re billed for the resources inside them or the network features you enable (like NAT Gateway).
Virtual Network Peering
Virtual Network (VNet) Peering allows you to connect two Azure VNets so they can communicate with each other. It’s essential when you want traffic to flow between separate VNets, either in the same region or across different regions. Let’s break it down:
What is Virtual Network Peering?
VNet peering establishes a direct network connection between two VNets. This makes it possible for resources in one VNet to communicate with resources in another VNet, even though they’re separate networks.
Example use case: If you have an application with a public front-end and a private back-end, you could use VNet peering to allow the front-end in one VNet to securely connect to the back-end in another VNet, ensuring isolation and security.
Types of Virtual Network Peering
Local VNet Peering:
Connects VNets in the same region.
Low latency and typically lower cost.
This is the default type of peering when the VNets are in the same region.
Global VNet Peering:
Connects VNets in different regions.
Useful for cross-region data transfer or when you need to link VNets in different geographic areas.
Higher cost compared to local peering because of the data transfer between regions.
Important Considerations for VNet Peering
IP Addressing:
Unique IP address ranges are crucial. If the VNets you want to peer have overlapping address spaces (e.g., both use 10.0.0.0/16), you will face conflicts and communication will fail.
Ensure your VNets are properly planned with non-overlapping IP ranges to avoid problems.
Security:
Peering allows communication, but you can control access using Network Security Groups (NSGs) and other security mechanisms.
Resources in the peered VNets can communicate freely unless you explicitly restrict traffic via security rules.
Resource Access:
Once peered, resources in each VNet can communicate with each other as if they were on the same network.
This is useful for cross-tenant or cross-subscription communication.
Cost:
Nominal fees apply for data transfer when using peering, especially with Global VNet Peering.
Local peering within the same region is typically free, but there could be charges for data transfer depending on your traffic levels.
How to Set Up VNet Peering
When setting up VNet peering, the process is straightforward:
Create two VNets (either in the same or different regions).
Initiate the peering from one VNet, specifying the second VNet as the peer.
Configure routing between the VNets (if needed). In some cases, you may want to adjust routing tables to ensure traffic flows as desired.
Practical Use Cases for VNet Peering
Cross-subscription communication: You can peer VNets in different subscriptions, useful for organizations that have multiple subscriptions (e.g., one for production, one for development).
Hybrid Cloud setups: In hybrid environments, you might peer an Azure VNet with your on-premises network via a VPN gateway.
Multi-tenant scenarios: If your organization is working with partners or clients, VNet peering enables secure communication without the need for exposing resources to the internet.
Service Endpoints
In Azure, compute resources like virtual machines often need to access platform services such as Azure Storage. While resources inside a Virtual Network (VNet) can communicate securely with each other, accessing platform services from within a VNet isn’t always straightforward.
One option is to assign public IP addresses to both your VNet and the service instance. Although this works, it exposes the service to the public internet, allowing connections from both trusted and untrusted sources—including users from outside your tenant. This raises serious security concerns.
To solve this, Azure provides a more secure approach: service endpoints and private endpoints.
What It Is
A service endpoint allows VNet resources to securely connect to Azure services over the Microsoft backbone network, rather than the public internet.
It creates a direct path between a specific subnet in your VNet and a supported Azure service (like Storage, SQL Database, etc.), enabling private, secure communication without using public IP addresses.
Think of it as a restricted-access gate between your VNet and the Azure service—it’s the only “endpoint” allowed for that access.
Key Characteristics of Service Endpoints
Improved Security: Removes the need to expose services to the public internet.
Regional Scope: The service endpoint and the VNet must be in the same Azure region.
Direct Connection: Uses Azure’s internal backbone network to route traffic securely.
Free to Use: There are no additional costs for enabling service endpoints.
Easy to Configure: You don’t need to change your service’s IP address or DNS settings.
Access Control: You can configure the Azure service to allow only traffic from specific subnets using this endpoint.
Private Endpoint
If you need even tighter security, you can use a private endpoint. This creates a private IP address within your VNet that maps to the Azure service.
It deploys a network interface (NIC) in your subnet.
Only resources in that subnet can access the service via this private IP.
Unlike service endpoints, private endpoints don’t require being in the same region.
Offers full isolation from the public internet.
Often used in regulated or compliance-sensitive environments.
Summary and Best Practices
Use service endpoints when your service and VNet are in the same region and you need secure access with minimal setup.
Use private endpoints when you need the highest level of isolation and control.
Always avoid public IPs for internal communication between tiers (e.g., compute ↔ storage).
Apply Network Security Groups (NSGs) and service firewall rules for extra control.
Remember: service endpoints are free, while private endpoints may incur Private Link charges.
Configure on Service side to make the service endpoint work
ExpressRoute
ExpressRoute is a service that establishes a private, dedicated connection between your on-premises network and Azure, bypassing the public internet. It is designed for organizations that require enhanced security, reliability, and performance for hybrid cloud deployments.
Why Use ExpressRoute?
Avoid the Public Internet: Unlike traditional VPNs, ExpressRoute does not rely on the public internet, reducing security risks and performance issues.
High Performance & Low Latency: It ensures better performance and more reliable connectivity compared to standard internet connections.
Security & Compliance: Ideal for organizations with strict data sensitivity, internal policies, or regulatory requirements, as data transmission occurs through a private connection.
Redundancy: Dual ExpressRoute circuits offer backup in case of failure, ensuring continuous hybrid cloud connectivity.
How ExpressRoute Works
Private Line: A dedicated line is established between your on-premises network and Azure, eliminating the use of public internet routes.
Integration with BGP: ExpressRoute uses Border Gateway Protocol (BGP) to exchange routing information between your on-premises network and the Azure Cloud. This makes routing seamless and dynamic.
Redundancy for Reliability: ExpressRoute allows for dual Microsoft Enterprise Edge (MSEE) routers in Azure, providing high availability and failover support in case of connection failure.
Global Connectivity: Once ExpressRoute is set up, it provides access to all regions in the Azure geography, simplifying multi-region access.
ExpressRoute Components
Azure Virtual Network Gateway: The Azure component responsible for handling the connection between your network and Azure via ExpressRoute.
On-premises VPN Device: A compatible device that connects your on-premises network to the Azure Virtual Network Gateway. It must support BGP to ensure proper routing.
Connectivity Provider: ExpressRoute requires a third-party connectivity provider to establish the private link between your on-premises network and Azure.
Types of VPN Connections (Context for ExpressRoute)
While ExpressRoute provides a private connection, it’s important to know how it compares to VPN connections:
Point-to-Site VPN: Ideal for individual devices (e.g., a single computer). It’s typically used for testing or temporary scenarios.
Site-to-Site VPN: A permanent connection between an on-premises network and Azure, often used in production environments. Unlike ExpressRoute, this connection uses the public internet.
ExpressRoute provides a more secure and stable option by avoiding the public internet, offering higher performance and privacy.
Cost Considerations
Azure Charges: The cost of using ExpressRoute is based on the service plan selected. You’ll need to account for the ongoing monthly fee for the ExpressRoute circuit.
Connectivity Provider Fees: The connectivity provider charges for the dedicated private line.
On-premises VPN Device: There may also be hardware costs for the device that establishes the connection.
Data Transfer Fees: Ingress (data entering) and egress (data exiting) traffic are charged, so consider the volume of data that will be transferred between your on-premises network and Azure.
Redundancy and Failover
ExpressRoute supports dual connections via Microsoft Enterprise Edge (MSEE) routers to ensure high availability. If one connection fails, the other automatically takes over, maintaining uninterrupted hybrid cloud connectivity. This redundancy is critical for mission-critical workloads.
Key Benefits
Enhanced Security: By using a private connection, ExpressRoute minimizes the exposure of data to the public internet, making it more secure.
Consistent and Reliable Performance: Offers predictable latency and better throughput, which is essential for enterprises with critical workloads.
Geographical Flexibility: Once configured, you can connect to Azure regions globally, simplifying the process of multi-region cloud setups.
Scalable: ExpressRoute allows organizations to scale their hybrid cloud architecture without compromising security or performance.
Virtual Network Gateway
A Virtual Network Gateway is a crucial component in connecting your on-premises network to Azure’s Virtual Networks (VNets). It acts as a secure entry point that allows data to be encrypted as it moves between your on-premises environment and the cloud.
In simpler terms, it’s the bridge connecting your private network to Azure, ensuring secure, encrypted data transmission.
Key Benefits:
Benefit
Description
Secure Data Transmission
Ensures encryption of data during transit between on-premises and Azure, safeguarding sensitive data.
Hybrid Cloud Connectivity
Allows seamless connection between on-premises networks and Azure, enabling hybrid cloud solutions.
Redundancy and Reliability
Deployable across multiple Availability Zones to ensure high availability and fault tolerance.
How It Works: Types of Connections
The Virtual Network Gateway supports various types of VPN connections, ensuring flexibility for different use cases. Here’s a breakdown:
1. Point-to-Site (P2S) VPN:
Use Case: Typically for individual devices like laptops.
Protocol: Supported protocols are SSTP, OpenVPN, and IPSec.
2. Site-to-Site (S2S) VPN:
Use Case: Connects an entire corporate network to Azure, used for production environments.
Protocol: Uses IPSec/IKE for secure tunneling.
3. VNet-to-VNet Connection:
Use Case: Used for connecting two separate Azure environments. This is common in scenarios like mergers or acquisitions.
Supported Protocols for Secure Connections
Protocol
Connection Type
Description
SSTP
Point-to-Site (P2S)
Secure tunneling via HTTPS.
OpenVPN
Point-to-Site (P2S)
Open-source VPN solution for encrypted connections.
IPSec
Point-to-Site (P2S) & Site-to-Site (S2S)
Standard VPN protocol used for encryption and secure data transfer.
IPSec/IKE
Site-to-Site (S2S)
Used for establishing secure connections between networks.
Redundancy and Availability
To ensure high availability and minimize potential downtime, the Virtual Network Gateway can be deployed across multiple Availability Zones in Azure. This guarantees that if one zone goes down, the connection remains intact via other zones.
Redundancy Features:
Multiple Availability Zones: Ensures that your gateway remains available even in the case of a zone failure.
Dual VPN Gateways: In Azure, you can configure multiple virtual network gateways for failover and load balancing.
Cost Considerations
There are several costs to take into account when using a Virtual Network Gateway:
Cost Component
Description
Hourly Gateway Charges
The virtual network gateway itself incurs an hourly charge.
Egress Traffic
Charges apply for data leaving Azure (egress traffic).
Ingress Traffic
Traffic flowing into Azure is free (no cost for ingress).
Additional Costs
Includes costs for on-premises VPN devices and your provider’s connectivity fees.
Azure DNS
Azure DNS is a cloud-based Domain Name System (DNS) service provided by Microsoft Azure. It is used to translate human-readable domain names (like microsoft.com) into machine-readable IP addresses, enabling your applications and websites to be accessible over the Internet.
In simpler terms, Azure DNS allows for the management of domain names and DNS records in the cloud, providing a reliable and highly available solution for managing domain name resolution. It can resolve domain names for resources both within Azure and on-premises environments, as well as for external resources on the Internet.
Public vs. Private Domains
Public Domains:
Definition: These are domain names that are accessible from the Internet.
Use Case: Hosting a website or service that needs to be accessible globally.
Example: microsoft.com, google.com.
Private Domains:
Definition: These domain names are only accessible within an organization’s private network.
Use Case: Internal resources, such as company servers or applications, that should not be exposed to the Internet.
Example: companyinternal.local.
Key Features of Azure DNS
Feature
Description
High Availability
Provides DNS resolution with 99.99% uptime and is backed by Azure’s global infrastructure.
Global Reach
Supports both public and private domains, allowing DNS resolution for Azure resources and external entities.
Integration with Azure
Fully integrates with Azure services like Azure AD, RBAC, and monitoring tools for security and management.
Security
Leverages Azure’s built-in security features to ensure DNS traffic is encrypted and protected from attacks.
Scalability
Scales automatically with increasing demand, providing high performance even during spikes in traffic.
How to Use Azure DNS
Create a DNS Zone: A DNS zone is a container for DNS records, like an address book for your domain names.
You can create a public DNS zone (for Internet-facing domains) or a private DNS zone (for internal network domains).
Add DNS Records: Once the DNS zone is set up, you can add various types of records:
A Record: Maps a domain to an IP address.
CNAME Record: Aliases one domain to another.
MX Record: Directs email traffic to the right mail server.
TXT Record: Allows for additional text-based information, often for verification or security purposes.
Link DNS Zones to Virtual Networks: For private DNS zones, link the zone to one or more Azure virtual networks to allow name resolution for your internal resources.
Manage with Azure Tools: You can manage Azure DNS through the Azure Portal, Azure CLI, or Azure PowerShell, allowing for flexible and automated management.
Azure DNS vs. Third-Party DNS Services
While third-party DNS services (like GoDaddy, Cloudflare, or Route 53) are widely used, Azure DNS is integrated directly into Azure, offering the following advantages:
Feature
Azure DNS
Third-Party DNS
Integration with Azure
Seamless integration with other Azure services like Azure AD and RBAC
May require additional configuration for Azure-specific services
Availability
Built-in 99.99% uptime SLA
Varies, but may require extra setup for high availability
Scalability
Scales automatically with Azure infrastructure
May require additional services to scale efficiently
Security
Built-in Azure security integration
May require additional configuration to match Azure’s security standards
Storage Services
Storage Account
An Azure Storage Account is a container for various storage services used by cloud applications. It’s not a separate Azure subscription or login—just a managed grouping of storage resources within your Azure subscription.
It adds statefulness to applications by storing persistent data.
Every application that reads, writes, or modifies data likely needs a storage account.
Storage Account Types
Type
Underlying Disk
Use Case
Performance
Services Supported
Standard General Purpose
HDD (Virtual)
Testing, dev, or low-priority apps
Baseline
Blobs, Files, Queues, Tables
Premium
SSD (Virtual)
High-performance, latency-sensitive workloads
High performance
Specialized: Block Blobs, Page Blobs, or File only
Note: Premium accounts are more specialized—you must select which data service it will host.
Core Storage Services
Available through the storage account:
Blob Storage (for unstructured data like images, videos, backups)
File Storage (SMB file shares, replacement for traditional file servers)
Queue Storage (message-based communication between apps)
Table Storage (NoSQL key-value store)
The term “Containers” here refers to Blob Containers, not Container Instances (from compute services).
Access & Security
Storage accounts are accessed via Service Endpoints or Private Endpoints.
Service Endpoints connect the storage service to your VNet securely over Azure’s backbone.
Private Endpoints deploy a NIC in your VNet for tighter network isolation.
Redundancy (High-Level Preview)
Azure allows configuring replication for resiliency:
Options like GRS (Geo-Redundant Storage), which replicate data across regions.
More on redundancy in upcoming modules.
How to create a storage account:
Go to the Storage Accounts blade.
Click “Create Storage Account”.
Choose:
Subscription
Resource group
Name (e.g., az900sa1 — no hyphens allowed)
Region (e.g., South US)
Performance tier (Standard or Premium)
Redundancy option (default: GRS)
Click Review + Create.
Once created, you can manage:
Containers (blobs)
File Shares
Queues
Tables
Data Services
Different types of data need to be stored using different storage formats—just like different types of food are served in different dishes. Azure provides various storage options tailored to the nature of the data being stored.
Key Feature: Managed file shares accessible like local folders.
Good For: Legacy applications or shared network storage in the cloud.
Azure Disks
Use Case: Persistent virtual hard disks attached to VMs.
Stores: OS, apps, and user data for VMs.
Key Feature: Not part of storage accounts, but a separate data service.
Comparison: Like a virtual hard drive for your virtual machine.
Quick Recap Table
Data Service
Structured?
Persistent?
Use Case
Blobs
Unstructured
Yes
Large files like videos, backups
Queues
N/A (Messages)
No (Temp)
Buffering between app components
Tables
Semi-structured
Yes
NoSQL storage, app configs, logs
Azure Files
Structured (Files)
Yes
File shares for users or apps
Azure Disks
Structured (Disks)
Yes
VM operating systems and app data
Access Tiers in Azure Blob Storage
Blob storage can become expensive due to:
Storage cost – how much data you’re storing.
Access cost – how often and how quickly you need to access that data.
To manage cost vs. performance, Azure offers three access tiers: 🔴 Hot | 🟡 Cool | 🔵 Archive
Tier Comparison Table
Tier
Storage Cost
Access Cost
Access Speed
Use Case
Availability
Hot
🔺 High
🔻 Low
Milliseconds
Frequently accessed data
99.99%
Cool
⚖️ Moderate
⚖️ Moderate
Milliseconds (slower)
Infrequently accessed data
99.9%
Archive
🔻 Lowest
🔺 Highest
Hours (retrieval delay)
Rarely accessed, long-term storage
N/A (offline)
Analogy (Bike, SUV, Bus)
Hot Tier → Bike: Small, fast, used daily.
Cool Tier → SUV: Medium capacity, slower, used occasionally.
Archive Tier → Bus: Huge capacity, very slow, used rarely.
Flexibility: Tier Transitions
You can move blobs between tiers as your access needs change:
Hot → Cool → Archive (to save costs)
Archive → Hot (if suddenly needed again)
This gives you dynamic cost optimization based on your current needs.
Summary
Choose the Hot Tier if you access data frequently.
Choose the Cool Tier for infrequent but still needed access.
Choose the Archive Tier for rarely accessed data where cost matters more than speed.
File Sync
Azure File Sync is a service that allows you to:
Sync on-premises file servers with Azure Files (cloud-based file shares).
Centralize your file management while keeping local access fast and seamless.
Why Use File Sync? (Use Case: Multiple Branch Offices)
Imagine your organization has 3 branch offices. Without File Sync, you face:
❌ Complex networking setups between offices.
❌ Difficulty keeping file versions consistent.
❌ Separate and complex backup systems in each location.
With Azure File Sync:
You centralize all file shares in Azure.
Users in any office can access files as if they were local.
You simplify backups and disaster recovery.
How It Works
Your on-prem file server syncs its data with Azure Files.
Files are locally cached on each branch’s file server.
Users access and edit files locally for fast performance.
Changes are synced to Azure and then to other branches — maintaining consistency.
Key Features
Feature
Description
Centralized cloud file share
Azure acts as the “source of truth” for all files.
Local caching
Frequently used files are stored locally for faster access.
Real-time sync
File changes are automatically synced across all locations.
Fault tolerance
If a file server fails, just replace it and resync from Azure.
Backup & Recovery
Use cloud snapshots to capture file states and recover when needed.
Protocol Support
Azure File Sync supports multiple protocols:
SMB (Server Message Block)
What it is: A network file sharing protocol mainly used in Windows environments.
Use case: Lets users or applications read, write, and request files on remote servers as if they were local.
Typical use: Windows file sharing, shared drives (like \\Server\SharedFolder)
Platform support: Native to Windows; also supported on Linux/macOS using Samba.
NFS (Network File System)
What it is: A protocol developed by Sun Microsystems for sharing files over a network, mainly used in Unix/Linux environments.
Use case: Allows users to mount a remote filesystem and interact with it like a local one.
Typical use: Linux servers sharing data with other Linux systems or with virtual machines.
Platform support: Native to Unix/Linux; can be used on Windows with additional tools.
FTPS (File Transfer Protocol Secure)
What it is: An extension of traditional FTP that adds SSL/TLS encryption for secure file transfers.
Use case: Securely uploading or downloading files to/from a server over the internet.
Typical use: Used in businesses to securely transfer sensitive data between systems.
Storage Redundancy
Azure automatically stores multiple copies of your data to protect against hardware failures and ensure high availability. You can choose how redundant your data should be, based on your needs and budget.
1. LRS (Locally Redundant Storage)
Copies: 3
Location: All within a single data center.
Protection: Against local hardware failures.
Limitation: If that one data center fails (e.g. due to fire, power outage), your data becomes temporarily unavailable.
✅ Cheapest ❌ Least resilient
2. ZRS (Zone-Redundant Storage)
Copies: 3
Location: Spread across three different Availability Zones in the same region.
Protection: Against the failure of an entire zone.
Limitation: Doesn’t protect against regional disasters (e.g., earthquake affecting all zones).
✅ More resilient than LRS ❌ Still vulnerable to regional outages
3. GRS (Geo-Redundant Storage)
Copies: 6
3 in the primary region (LRS)
3 in a paired secondary region (also LRS)
Location: Two separate geographic regions.
Protection: Against regional disasters (e.g., major natural disaster, wide-scale outage).
Limitation: Secondary region is read-only until failover is manually initiated.
✅ Most resilient of the standard options ❌ Slightly higher cost ❌ Not always immediately accessible from the secondary region
4. RA-GRS (Read-Access Geo-Redundant Storage)
Extends GRS by allowing read access to the secondary region.
Useful for disaster-readiness and reporting apps.
Data can be read even when the primary region is down.
5. GZRS (Geo-Zone Redundant Storage)
Combines ZRS and GRS.
Stores data across Availability Zones in one region plus copies in a paired region.
Adds read access to the secondary region on top of GZRS.
Best for mission-critical apps needing maximum durability and availability.
**Summary Table
Type
Copies
Spans
Read Access
Protects Against
Use Case
LRS
3
Single data center
No
Local hardware failure
Low-cost, non-critical data
ZRS
3
Across 3 AZs in one region
No
Data center or AZ failure
High availability within region
GRS
6
LRS in primary + LRS in paired region
No
Regional disaster
Business continuity, backup
RA-GRS
6
Same as GRS
Yes (read from secondary region)
Regional disaster + read fallback
Read-heavy apps needing resilience
GZRS
3+3
ZRS in primary + LRS in paired region
No
AZ + regional disaster
High availability + geo resilience
RA-GZRS
6
Same as GZRS
Yes
AZ + regional disaster + read fallback
Enterprise-critical apps
Data Management Tools
When you store data in Azure, you need tools to manage it—whether you’re uploading files, moving them between containers, or automating operations.
Azure provides two key tools:
AZCopy (Command-Line Tool)
Type: Command-line interface (CLI)
Best for: Experienced users, developers, and automation
Use Cases:
Uploading/downloading blobs and files
Copying data between storage accounts
Scripting and automation at scale
Advantages:
Fast and efficient for large-scale data transfers
Automatable with scripts
Authentication Supported:
Azure Active Directory (Azure AD)
Shared Access Signature (SAS) tokens
Great for repetitive tasks and large volumes of data where GUI tools become inefficient.
Storage Explorer (Graphical Tool)
Type: Graphical User Interface (GUI)
Best for: Beginners and visual users
Use Cases:
Browsing containers and blobs
Uploading/downloading files manually
Managing access and metadata visually
Advantages:
Intuitive and visual
Easier to learn and use for small workloads
Authentication Supported:
Azure AD
SAS strings/URLs
Account name and key
Fun Fact: Storage Explorer uses AZCopy behind the scenes to perform actions. It’s basically a GUI wrapper for AZCopy.
Data Migration
If you’re planning to move your infrastructure to the cloud, Microsoft provides a set of tools under the umbrella of Azure Migrate to assess and execute that migration efficiently.
Azure Migrate Hub
A centralized platform that helps evaluate and migrate various components of your on-premises environment. It contains several specialized tools:
Discovery and Assessment Tool
Scans existing infrastructure and services.
Determines which workloads are suitable for migration.
Migration and Modernization Tool
Evaluates physical servers and VMs on hypervisors (e.g., VMware, Hyper-V).
Determines compatibility with Azure Virtual Machines.
Web App Migration Assistant
Checks .NET and PHP web applications.
Assesses readiness for migration to Azure App Service.
Data Migration Assistant (DMA)
Analyzes Microsoft SQL Server databases.
Reports on compatibility with Azure SQL Database.
✅ These tools generate reports categorizing workloads as:
Ready to move
Need minor tweaks
Require major changes
Not suitable for migration
Azure Data Box
For massive data transfers (especially initial bulk migration), Microsoft offers a physical solution:
What It Is: A rugged, encrypted hard drive shipped to you.
Capacity: Up to 100 TB (or 1 PB with Data Box Heavy)
Use Case: When you have 40+ TB of data that would take too long or be too costly to transfer over the network.
Steps:
Request the box via the Azure portal.
Copy your data to it (files, VMs, DBs, etc.).
Ship it back to Microsoft.
Azure uploads it into your tenant securely.
Afterward, incremental updates can be synced over the internet.
Data is encrypted in transit and at rest. The box is tamper-proof.
Migration Strategy Tip
After assessment:
Migrate “ready” workloads first.
Plan remediation for partial or incompatible systems.
Use Azure Migrate + Data Box to streamline both evaluation and transfer.